• Welcome to the Land Rover UK Forums

    You are currently viewing the site as a guest and some content may not be available to you.

    Registration is quick and easy and will give you full access to the site and allow you to ask questions or make comments and join in on the conversation. If you would like to register then please Register Now

Series III LWB 'Tent on Wheels' Conversion

A lot of thought going into this - great work.
I don't know what space you have available for your water tank but there are a lot of potable water tank options out there. Will none of them fit and save you some work?
You can also buy them with the water feeds and filling points already fitted. My big mistake was forgetting to buy one with internal baffles (60L).
How do you plan to fill the tank? External fill point or hose/funnel and jerry can?

Thanks for the kind words.

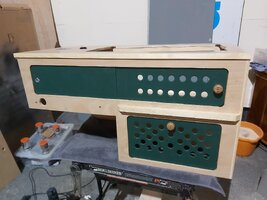
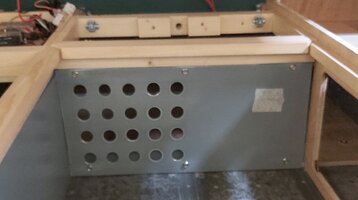
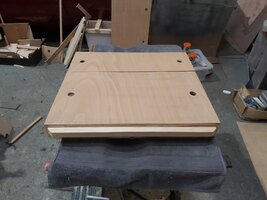
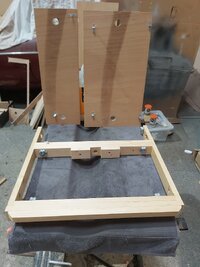
The water tank and how to fill it has been an ongoing issue throughout the build and has now become a real compromise. This has partly arisen because I couldn't find a decent sized commercially available tank to fit anywhere (and I did a lot of looking). So I've ended up where I am...

Ultimately, I'll build it as currently proposed, but if after a couple of trips I find that water is an issue, I'll redesign.

The best solution would I think be to have an underslung tank - lots of room, as my LR is ex military, so fuel tanks are under the seats.

Generally I'm anti an external fill point as I want to keep the exterior as original as possible, there is also one of my original design principles to consider, that the whole 'conversion' insert, could simply be unbolted to revert to original if so desired.
 
..... could simply be unbolted to revert to original if so desired
Fair point. I can understand your desire to retain the authenticity and not cut into the bodywork.
Mine's a TD5 so I don't really have the vintage accuracy to worry about. I took the decision early on that I'd change mine to suit the intended use and if a future owner didn't like my modifications they'd be ripping the thing apart to suit their needs anyway - so as you know my conversion is built in and permanent. Having said that I've made a point that anything bolted on externally must have a practical purpose and not just be cosmetic (one exception - the front grill).
There's were a few 30-40L water tanks on those and some other links, although I guess the dimensions didn't work for your available space.
Your installation is a lot more complex than mine - will be good to see it all in situ.
 
I seem to have spent quite a bit of time in the barn recently without much to show for it...
Also tackling the paint removal of the galvanised body top strips - using an old (sharpened) chisel and wire wool for this, so a bit laborious, decided to spend 20 mins every time I go to the barn on it, as I couldn't face a whole session of it...

Anyway, on with the build, I popped on an angled return on the bottom edge of the bench, for trim panels to secure to, that'll form storage under the bench and be accessed through it. I also had to add a strengthening panel at the bench mid point.

20240403_185633.jpg


Then, cut the front trim panel, using a 4mm aluminium faced composite board - which is actually a 'recycled' advertising board from my local non league football team. Once fully trial fitted this'll be covered in vinyl.

20240403_185457.jpg


I've also been doing a lot of varnishing, so much so, that it's (for now) over!

20240403_185728.jpg


So, lots to be getting on with...
 
I seem to have spent quite a bit of time in the barn recently without much to show for it...
Also tackling the paint removal of the galvanised body top strips - using an old (sharpened) chisel and wire wool for this, so a bit laborious, decided to spend 20 mins every time I go to the barn on it, as I couldn't face a whole session of it...

Anyway, on with the build, I popped on an angled return on the bottom edge of the bench, for trim panels to secure to, that'll form storage under the bench and be accessed through it. I also had to add a strengthening panel at the bench mid point.

View attachment 527545

Then, cut the front trim panel, using a 4mm aluminium faced composite board - which is actually a 'recycled' advertising board from my local non league football team. Once fully trial fitted this'll be covered in vinyl.

View attachment 527546

I've also been doing a lot of varnishing, so much so, that it's (for now) over!

View attachment 527547

So, lots to be getting on with...
Very impressive. You're really making good progress. I can very much relate to allotting a specific amount of time to the drudgery type jobs and at intervals between other work... It's a good way to keep from getting fatigued by them.
 
With the varnishing done, there's lots to be getting on with.

I started with the cross bench and fitted it up with the fixings for the tops.

20240408_181119.jpg


This is how the tops fit.

20240408_181316.jpg


Then I moved onto the cross bench lower trim panel, once again I used 4mm aluminium composite board - lots of measuring and test fitting, this is the end result - the holes are for airflow circulation around the leisure batteries.

20240408_180735.jpg


I then moved into the back of the LR and drilled and added fixings to the cross bench and leisure battery base aluminium angle returns - again lots of careful measuring, the fact the rear floor isn't straight complicated matters...

20240408_175832.jpg


This is how it looks in place - hopefully everything makes a bit more sense now.

20240408_175455.jpg


Before taking everything out again so I can finally clean, sand and cover in vinyl the trim panel.

I then moved onto the fridge unit and popped the doors back on - not strictly the right time to do it, but I wanted to see how they looked. Also popped in an elasticated strap to (hopefully) stop the fridge bouncing around too much.

20240408_190559.jpg


Oh, managed a bit of waist rail paint removal too.
Next up I want to get the bench lower trim panels cut and ready for trimming, whilst carrying on fitting up the fridge unit, with a bit more paint removal too...
 

Attachments

  • 20240408_190559.jpg
    20240408_190559.jpg
    244.4 KB · Views: 3
  • 20240408_175455.jpg
    20240408_175455.jpg
    192.5 KB · Views: 3
  • 20240408_175832.jpg
    20240408_175832.jpg
    209.9 KB · Views: 3
  • 20240408_180735.jpg
    20240408_180735.jpg
    350.9 KB · Views: 3
  • 20240408_181316.jpg
    20240408_181316.jpg
    252.9 KB · Views: 3
  • 20240408_181119.jpg
    20240408_181119.jpg
    290.1 KB · Views: 1
So, on with the bench lower trim panel.

Using the aluminium faced composite board, I cut and screwed the trim panel together, remembering to leave clearance for the vinyl covering.

20240411_180414.jpg


Then trial fitted it into the LR.

20240411_174609.jpg


Before removing it, drilling for fastener fixings and terry clips for tool storage, and test fitting back in the LR.

20240411_181625.jpg


It's not really tool storage, it's starting handle storage, which was in the box of bits in the back of the car when I bought it. I've tried to start the car with the handle as a test, but failed miserably, has anybody succeeded starting an LR with it? Is there a knack?

20240411_181643.jpg


That might be it for a bit - my car went 'bang' on the way home - so a couple of 'issues' to overcome before I can get on with the LR...
 
I can remember my gran starting her Triumph Herald with the handle on cold days when the battery was straining to turn it over!

Thumbs and wrists can be broken, so watch some videos and get the technique right...


I can remember my gran starting her Triumph Herald with the handle on cold days when the battery was straining to turn it over!

Thumbs and wrists can be broken, so watch some videos and get the technique right...


I find it amazing that you can do this seeing that a starter takes 200+ rpm to start an engine with a starter motor ..
 
I believe that the same principle is used with some stop-start cars.
When the car stops the computer turns off the engine, but computer knows which cylinder is on compression so re-starts it by supplying a spark to that cylinder to get it to fire and start the engine again.
 
I can remember my gran starting her Triumph Herald with the handle on cold days when the battery was straining to turn it over!

Thumbs and wrists can be broken, so watch some videos and get the technique right...


I haven't watched the video yet but I can say two things from experience: always keep your thumb over the handle with your fingers and always pull up on compression only - never push. Half turn pulls upwards and let go. Watching people just grab the crank and start spinning all the way around always freaks me out. You can get killed doing that!
 
Really nice work. Had to laugh when you mentioned the floor not being straight - know how you feel.
Watching people just grab the crank and start spinning all the way around always freaks me out. You can get killed doing that!
You want to try it spinning aircraft props. Hated doing that. I know two people, one without a couple of fingers and one with part of his hand missing from hand starting aircraft. The worst part was watching my son do it on his aircraft. We only have one aircraft that need hand starting now. Got rid of the other three.
 
Last edited:
I can remember my gran starting her Triumph Herald with the handle on cold days when the battery was straining to turn it over!

Thumbs and wrists can be broken, so watch some videos and get the technique right...


Many thanks for that - will give it a go when I next get a chance...
 
Managed to borrow a car, whilst the search for a replacement daily driver goes on, so I can get a bit done on the LR.

Managed to trim the bench lower trim panels in green vinyl and trial fitted them - decided I now need japanned screw cups and screws to secure them, rather than the current shiny ones...

20240418_193448.jpg


Then started on the water tank, cutting the base, sides and battens.

20240418_175131.jpg


Will really have to get on with the wiring in the cab soon, as I'm starting to run out of other things to do...
 
Managed to trim the bench lower trim panels in green vinyl and trial fitted them
That looks really neat. Well done. Taking shape nicely.
I know what you mean about the shine screw cups. I've bought solid ones with a flat base rather than pressed screw cups with an outer edge that digs in. I'll be spraying mine satin black before fitting.
Will really have to get on with the wiring in the cab soon
Can you come and do my front cab electrics while you're at it. Not looking forward to that part of the build.
 
I cracked on and cut, glued and screwed the battening onto the water tank sides and base.

20240422_162019.jpg


Just to prove it does all come together.

20240422_162441.jpg


It's a bit too cold to get on with fibreglassing the inside of the water tank, so got on with lots of little jobs.

Cleaned out the front cab prior to restarting on the wiring.
More depainting of the galvanised body top strips.
Started wiring up the fridge unit 240v plug sockets.

None of it really photo worthy, apart from blacking my pick axe.

20240422_161818.jpg


Lastly, one of the attractions of having a tent on wheels is that the canvas sides can become an awning, which needs awning poles, these will attach via brackets and terry clips to the canvas tilt frame. Firstly here's the bracket template in place on the awning pole.

20240424_184641.jpg


And now splayed flat with drill holes - I'll need 3 of these, made using sheet ally.

20240424_191452.jpg


I'm starting to think I'll do anything to avoid the dreaded wiring...
 
Back
Top Bottom